Is
Rooting on
Android Phone make the
warranty void? Yes....because Rooting on an Android Phone is the process of modifying the Operating System on your device to grant you complete control over it.
But you do not need to worry because with the UniversalAndRoot App, rooting becomes a simple task that any person can do. Which makes the warranty void is to
unlock the
bootloader, because some tutorials suggest to do it as a rooting procedure.
With
UniversalAndRoot App you do not need to unlock it, and the best thing is, You can even Unroot your phone and get it back to the original state. So it's
safe and
easy.
Why do I need to
Root my Android Phone, what are the benefits?
Root doesn't unlock your phone for other carriers. It gives you super user access aka SU. It will allow you to flash custom ROMs and themes. Some apps require root to work properly. And also you will get :
1. Full control over your system
2. Ability to alter system files. You can replace many parts of the "Android Core" with this including:
^ Themes
^ Core apps (maps, calendar, clock etc)
^ Recovery image
^ Bootloader
^ Toolbox (linux binary that lets you execute simple linux commands like "ls") can be replaced with Busybox (slightly better option)
^ Boot images
^ Add linux binaries
3. Run special apps that need more control over the system
^ SuperUser (lets you approve or deny the use of root access to any program)
^ Task Manager For Root (Lets you kill apps that you otherwise could not kill)
^ Tether apps (like the one found at android-wifi-tether.googlecode.com)
^ And many more
4. Backup your system
^ You can make a folder on your sdcard and backup all of your (.apk) files to your sdcard (helps if an author decides to "upgrade" you to a version that requires you to pay to use the version you just had)
5. Relocate your (browser/maps/market) cache to your /sdcard
6. Relocate your installed applications to your /sdcard
7. Reboot your phone from the terminal app easily (su
reboot )
This application can only work on mobile phones below (for now):
 |
* Google Nexus One (running 2.2)
* HTC Hero (2.1)
* HTC Magic (1.5)
* Dell Streak (2.1)
* Motorola Milestone (2.1)
* Motorola XT701
* Motorola XT800 (2.1)
* Motorola ME511
* Sony Ericsson X10 (1.6)
* Sony Ericsson X10 Mini Pro (1.6)
* Acer Liquid (2.1)
* Vibo A688 (1.6)
* LG1 1.6
* Mytouch 3G Slide
* LG Ally
* HTC Tattoo
* More to come |
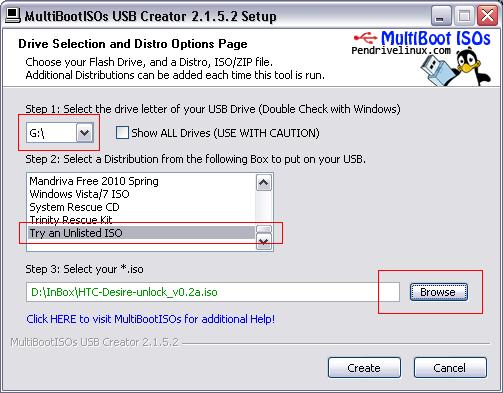
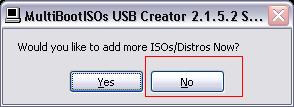
Download the
latest version of UniversalAndRoot App, and install it on your device. Make sure your phone is supported by the application or it will brick your phone, and then follow steps below :
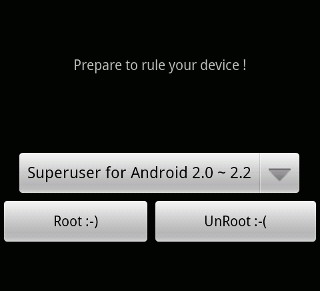
1. Open application
2. In the dropdown menu, select your current Android version.
3. Tap on the Root button. Wait for about 5 seconds until all status are (OK).
4. Your phone is now rooted.
To Unroot select "UnRoot" button.